Introduction
Containers are usually associated with high-end server boxes. This is exactly the place where they first appeared. At some point during evolution of hardware, computational power of single server box became high enough to host dozens of independent services side by side. This created problems with resource prioritization and security. Eventually container technology emerged. It allowed developers to lock every single service into separate, isolated, secure environment with only small performance overhead. Moreover, developers gained precise tool to distribute system resources among these environments.
The reasons to use containers in a workstation are different. The first one is to isolate binary non-trusted applications, such as messengers, games, IDEs and CADs — actually, any software that requires connectivity to the Internet but cannot be audited because it is not open source. Who knows what information about the user such software collects and sends to the outside? To install such an application directly to the host system would be unhygienic to say the least. It would nullify all the hard work performed by Linux developers and maintainers regarding security and privacy protection. Browsers can also be considered insecure, partly because of constant stream of bugs and partly because JavaScript is allowed to do nasty things, such as scanning local ports and querying for geolocation. Confining browser in a container is more robust solution to this problem than installing protective browser plugins.
Another good reason to use containers on workstation stems from the necessity to work with third-party software that requires hard-to-meet dependencies. All Linux distributions adhere to the philosophy of packing every — no matter how small — library into separate versioned package. As such, some third-party software may require installation of dozens of dependencies, often of specific versions, not provided by your Linux distribution. Situation is aggravated when you need to install a package created for another distribution (e.g. Debian package for Ubuntu or vice versa), since different distributions use somewhat different naming and versioning schemes for their packages. Creating separate container for such software makes dependency satisfaction natural and without performing any modifications to the host system. You can run multiple containers in parallel with different Linux distributions and/or distribution releases depending on third-party software requirements. You can also compile source code from scratch and run infamous "make install" inside the container. If you spoil some container too much or break it, you can cheaply recreate it from scratch.
Containers on workstation also simplify local debugging of cluster architectures. The idea is to create a scaled-down copy of large production cluster in a developer’s workstation. Every physical node is instantiated locally as a container (possibly with container nesting if you use containers in production cluster). Such scaled-down copy is a full representation of the large production cluster, with all the components and interconnections present. A huge part of errors can be discovered and debugged locally while running tests in such setup before moving to large-scale integration testing with real hardware and network.
There are currently plenty of container management software for Linux: nearly monopolistic Docker, LXD over LXC, or LXC alone. They work at different levels as roughly visualized below:
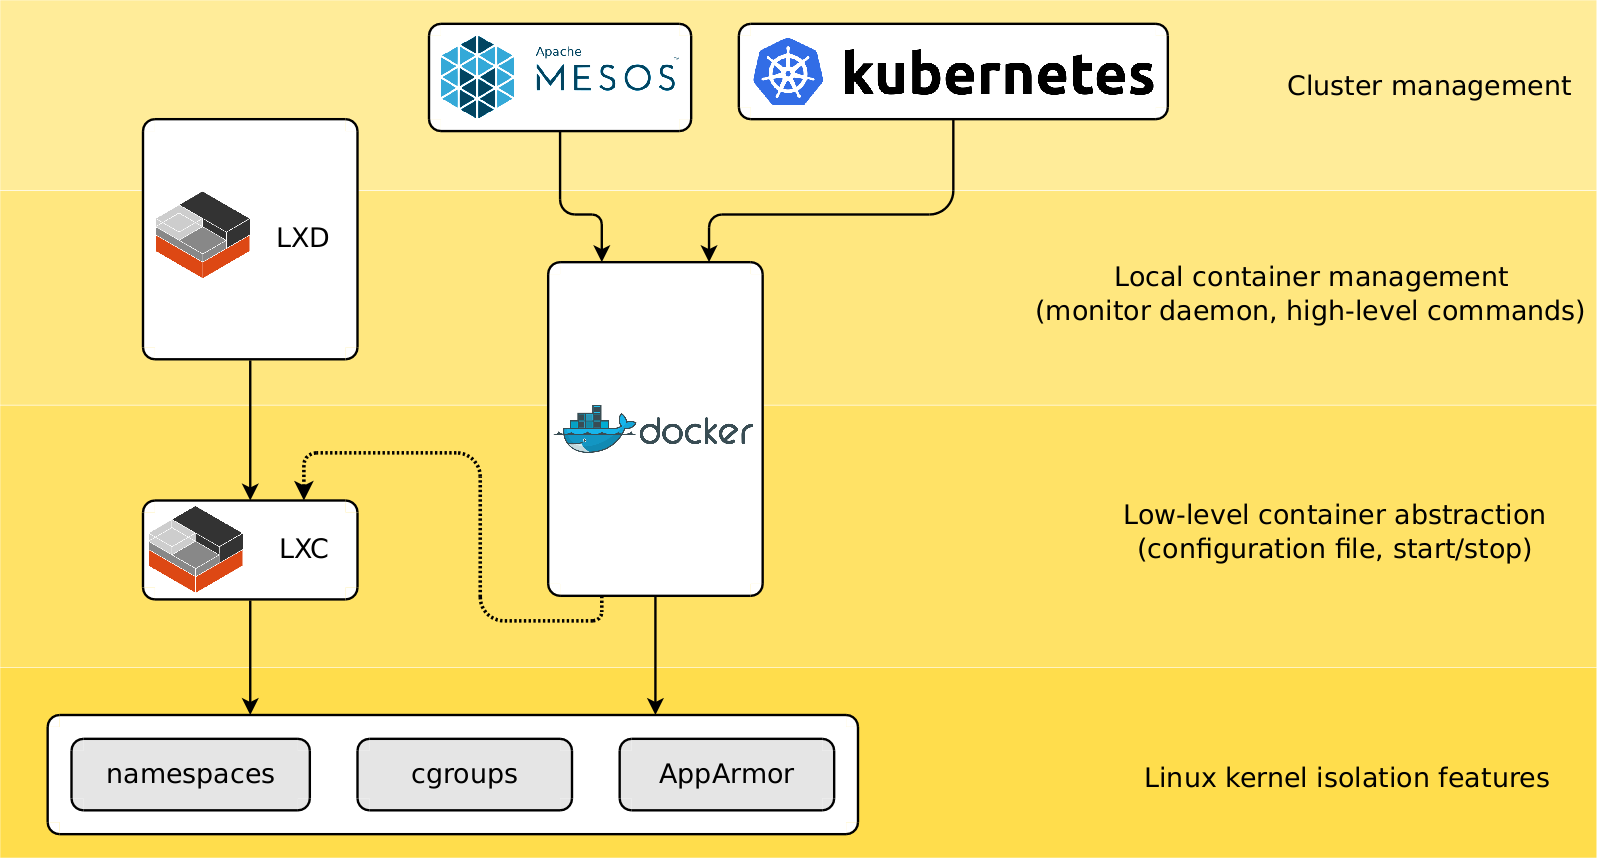
LXD and Docker are examples of high-level container managers which attempt to create out-of-the box solution to deal with standard use cases. LXC is located lower. As such, it provides more control of what you are doing but demands more manual labour in return. Whether you decide to use low-level LXC for container management or to switch to higher level Docker or LXD, even single-time experience with LXC will provide you with a wealth of knowledge about troubleshooting various Linux desktop subsystems.
The rest of the article is a step-by step instruction on how to setup LXC containers in Debian "buster" for use in everyday desktop environment. First section describes basic setup, and the following sections add progressively information on networking, X server, PulseAudio and USB devices.
Creating containers from prebuilt images
First section won’t be significantly different from the guide provided by LXC site. Obviously we need to install lxc package first. In the command below I also added additional option to apt-get as I always do to avoid installing unnecessary packages.
gudok@gudok6:~$ sudo apt-get --no-install-recommends install lxcLXC package brings a lot of lxc-* commands into the system. Among the most widely used are lxc-create, lxc-start, lxc-info, lxc-stop and lxc-destroy used to manage lifecycle of containers, and lxc-attach to connect to containers and run commands inside them. The same package also installs two systemd services: lxc and lxc-net. lxc-net is used to setup virtual network. lxc service automatically starts those containers during boot time which were configured with autostart. Virtual network is disabled by default and there are no containers present. Thus these services do not spawn any daemons right after the installation.
gudok@gudok6:~$ sudo systemctl status lxc-net
● lxc-net.service - LXC network bridge setup

gudok@gudok6:~$ sudo systemctl status lxc
● lxc.service - LXC Container Initialization and Autoboot Code
Everything is ready to create our first container.
There are two common ways of doing this.
The first one is to download prebuilt image provided by LXC team,
and another one is to build image from scratch with custom script.
Containers created in these two ways have a bit different set of initially installed packages and system settings.
We will try both of them.
lxc-create is the top-level command used to create new containers.
However, it doesn’t do it by itself.
Instead it calls one of the helper template scripts from /usr/share/lxc/templates/.
Every template defines its own set of options, which are passed from lxc-create.
The "lxc-download" template is the script used to download prebuilt images from LXC team. Prebuilt images are available for all recent releases of well known linux distributions. Let’s call it once directly to list its options and second time to list available images. Second command connects to remote server and may take some time to complete as a consequence:
gudok@gudok6:~$ /usr/share/lxc/templates/lxc-download --help
LXC container image downloader

Special arguments:
[ -h | --help ]: Print this help message and exit
[ -l | --list ]: List all available images and exit

Required arguments:
[ -d | --dist <distribution> ]: The name of the distribution
[ -r | --release <release> ]: Release name/version
[ -a | --arch <architecture> ]: Architecture of the container
....

gudok@gudok6:~$ /usr/share/lxc/templates/lxc-download --list | grep debian | grep amd64
debian  bullseye amd64   default 20190825_05:24
debian  buster   amd64   default 20190825_05:24
debian  jessie   amd64   default 20190825_05:24
debian  sid      amd64   default 20190825_05:24
debian  stretch  amd64   default 20190826_05:24
Now instruct lxc-create to use lxc-download template to create new container
from specified image (distribution, release, architecture) with given name ("ff" below).
Options after -- are passed to the template script.
Important note is that all lxc-* commands should be run under root user.
This will create so-called "privileged" containers, which are easier to work with.
gudok@gudok6:~$ sudo lxc-create -t /usr/share/lxc/templates/lxc-download -n ff -- -d debian -r buster -a amd64
Unpacking the rootfs
You just created a Debian buster amd64 (20190825_05:24) container.
Setup of the new container is over. Now you can start it, attach to it and test it. As with any Linux setup, the first steps inside the container would be the installation of some essential packages, such as less, vim, procps (top) and maybe openssh-server.
gudok@gudok6:~$ sudo lxc-start -n ff
gudok@gudok6:~$ sudo lxc-attach -n ff
root@ff:/# echo 'Hello!'
Hello!
This completes initial setup and now you can use newly created container for your needs.
Container management is done with lxc-* commands.
Take some time to accustom yourself to them.
The container is installed into /var/lib/lxc/ff and consists of simple
key/value configuration file along with root filesystem.
Default configuration file is enough to use container, albeit without networking and device access.
Read the configuration file and try to understand what its options are responsible for.
We will modify it later multiple times as we will be adding features to our container.
Some explanation of the options may be found in manual page lxc.container.conf(5).
In addition to configuration file, there is also the root filesystem.
Its internals are the basic linux setup.
Shell on the host can be used to copy files directly to and from container’s filesystem
without using scp and directory mounting.
Creating containers using custom templates
Another way of creating containers is to build their images on the fly by using per-distribution templates. Debian comes with a set of custom templates for Debian, Ubuntu, CentOS and other distributions. These scripts build root file system either entirely from scratch or by using distribution’s recommended tool, such as debootstrap in case of Debian. The benefits of this method are that only Debian APT repository is accessed and that template scripts can be easily adjusted to someone’s needs. However, templates which come with Debian "buster" are deprecated in favor of downloading prebuilt packages. Images produces by these templates are different from prebuilt packages and lack some features. Anyway, I recommend to use this method at least once to understand the process under the hood.
Starting with Debian "buster", custom template scripts are not part of lxc package.
They were deprecated and moved into separate lxc-template package.
Installing it brings a lot of per-distribution templates, in our case we are interested in "lxc-debian" template.
Let’s use it to build new container.
The options of lxc-debian template are similar to that of lxc-download, i.e. we need to specify
desired release ("buster") and architecture ("amd64").
The command takes a couple of minutes to complete on the first run.
It internally calls debootstrap which downloads and unpacks a number of .deb packages
(lxc-create → lxc-debian template → debootstrap → package download).
After the first run, downloaded packages become cached, and further containers are created nearly instantaneously.
After calling debootstrap, lxc-debian template also heavily patches
newly created container filesystem.
It modifies its various configuration files in /etc among other things
because container setup differs significantly from setup on raw hardware.
You are encouraged to look into /usr/share/lxc/templates/lxc-debian to see what template script is doing.
gudok@gudok6:~$ sudo apt-get install --no-install-recommends lxc-templates
Setting up lxc-templates (3.0.3-1) ...

gudok@gudok6:~$ sudo lxc-create -t /usr/share/lxc/templates/lxc-debian -n gg -- -r buster -a amd64
debootstrap is /usr/sbin/debootstrap
Checking cache download in /var/cache/lxc/debian/rootfs-buster-amd64 ...
Creating SSH2 RSA key; this may take some time ...
2048 SHA256:7g5pkOI9NXcoVG09aRjKMllxBYJb1nvNLuavvJ7W2ZA root@gudok6 (RSA)
Current default time zone: 'Etc/UTC'
Environment variables
When attaching to a container, all host’s environment variables are propagated into container by default.
This may cause applications to malfunction, for example because they aware of some
environment variable that refers to a system resource present in the host but not in the container.
Additionally, if you have some secrets (passwords, URLs) set up as environment variables,
then they also will leak to the processes inside the container.
To be on the safe side, it is better to attach to containers by using lxc-attach --clear-env -n <container>.
This will disable propagation of host’s variables into the container.
The downside is that it clears too many variables.
So, in addition to --clear-env I recommend to manually set essential variables.
This can be done in /etc/lxc/default.conf.
After that containers must be restarted for changes to take effect.
lxc.environment = USER=root
lxc.environment = HOME=/root
lxc.environment = TERM=xterm-256color
Accessing host data
Mounting host filesystem nodes into container is easily done with bind mounts. Bind mounts are closer to hard links rather than to true mounts. They create another view of some already existing node. Even better, bind mounts allow source node to be not necessarily a directory, but also a plain file or a unix socket. Created view may be set to readonly mode, and there is even no restriction that source and target nodes must be present in the same filesystem instance.
Bind mounts are created by appending one or more lxc.mount.entry options
to configuration file of the container.
The value of this option has the same format as entries in /etc/fstab.
The most widely used options are ro/rw to select readonly or read/write permissions,
bind instructs to use bind mount, and LXC-specific create=file or create=dir
will automatically create target file/directory in a container for you if it doesn’t exist.
Note that absolute paths refer to host filesystem,
while relative paths are relative to container filesystem.
In the example below the first variant is the correct way of specifying mount entry.
The second variant is also correct and does exactly the same thing
but it is not so robust because of hardcoded path to container filesystem.
The third variant is wrong, because it instructs
to mount directory into host’s /root/video, not into the container’s one.
lxc.mount.entry = /volume/DATA/video root/video none ro,bind,create=dir 0 0
lxc.mount.entry = /volume/DATA/video /var/lib/lxc/some_container_name/rootfs/root/video none ro,bind,create=dir 0 0
lxc.mount.entry = /volume/DATA/video /root/video none ro,bind,create=dir 0 0
Mounting is only one half of the solution. Another one deals with permissions. Suppose that you have a directory in the host and you want to share this directory into container and make it painlessly writable from both host and container. To do this, you need to ensure that UID/GID of your user inside the container matches UID/GID of your user in the host.
The simplest way would be to create a user inside the container with the same UID/GIDs as your user in the host, and work in the container as this newly created user. The commands below will create user "gudok" in the container which is exactly the same entity as host’s "gudok" from permissions perspective. This works because in privileged containers UID/GIDs refer to the same UID/GIDs in the host.
gudok@gudok6:~$ sudo lxc-attach --clear-env -n ff
root@ff:/# apt-get install libuser
root@ff:/# /usr/sbin/groupadd --gid 1000 gudok
root@ff:/# /usr/sbin/useradd --uid 1000 --gid 1000 --create-home --shell /bin/bash gudok
root@ff:/# exit
gudok@gudok6:~$ lxc-attach --clear-env -n ff -- su gudok
If your prefer to work as root inside container, things are more complicated.
What we need to do is to map container’s UID/GID=0 to host’s UID/GID=1000.
This means that files created in host with UID/GID=1000 as owner will be visible as UID/GID=0
inside a container and vice versa.
To do so, first we will need to allow root user to create explicit UID/GID mappings.
Add following line to both /etc/subuid and /etc/subgid.
It will allow root user to map container’s UID/GID to any UID/GID on the host that we want:
root:0:2147483647
Now let’s create create explicit mapping in /etc/lxc/default.conf:
lxc.idmap = u 0 1000 500000
lxc.idmap = g 0 1000 500000
All newly created containers will have UID/GID=[0, 0+500000] mapped into host UID/GID=[1000, 1000+500000]. In particular, UID/GID=0 in the container becomes UID/GID=1000 in the host. This is exactly what we want. What looks as root user UID/GID=0 inside container, is actually "gudok" UID/GID=1000 in the host:
gudok@gudok6:~$ sudo ls -ln /var/lib/lxc/ff/rootfs/ | grep root
drwx------  2 1000 1000 4096 May 30 21:14 root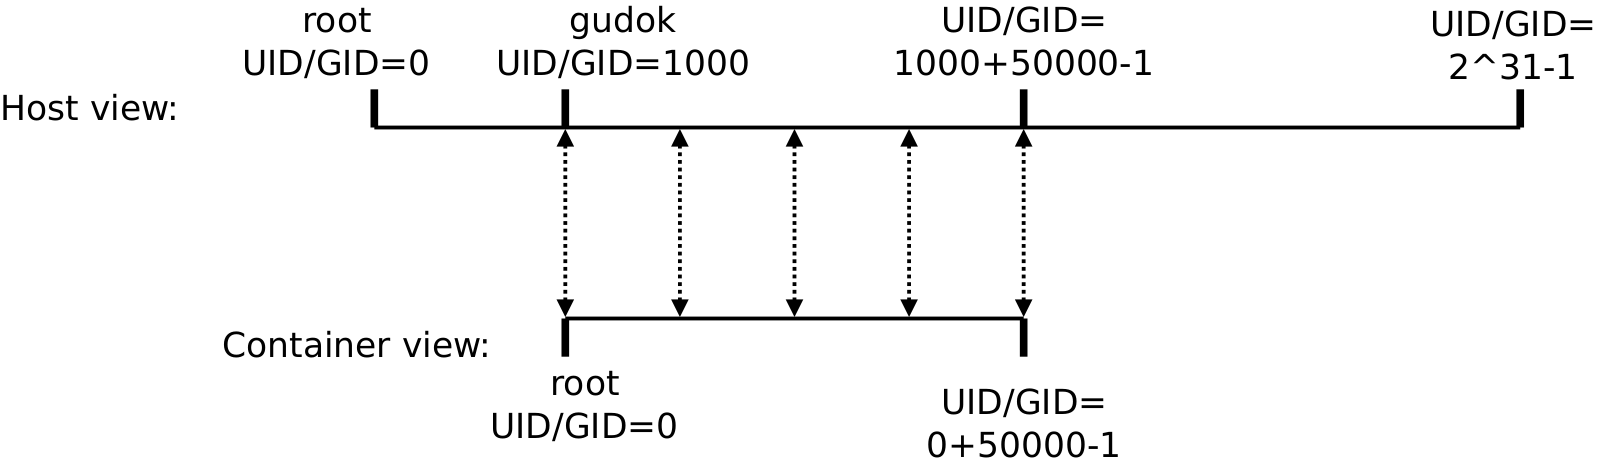
Acknowledgments. The idea of creating one-to-one mapping between container’s user and host’s user
belongs to Rudolf Vesely.
This solution is so neat compared to ugly lxc-usernsexec that I suggested to use before.
Thanks, Rudolf!
Network: basic setup
Nearly all modern software requires Internet connection. Networking in container systems is ugly. The most standard way to enable container networking in LXC is to create virtual switch. Host machine and all containers "connect" to ports of this switch. Additionally, host machine provides routing, DHCP and DNS capabilities to containers. This configuration looks like a typical local network, with the exception that this is not a physical LAN, but is an emulated one:

Of course, any non-standard network configuration is possible.
For example, someone might want to expose physical network interface to one of the containers,
or to create multiple virtual switches with one switch per every container.
The trouble is that any non-standard configuration would require writing a lot of scripts,
while the configuration described above is already implemented in scripts shipped with LXC package.
To enable it, you only need to modify one shell variable.
Create file /etc/default/lxc-net with the following contents:
USE_LXC_BRIDGE=trueSettings in this file override default values from /usr/lib/x86_64-linux-gnu/lxc/lxc-net
and from /etc/default/lxc.
Effective default settings are listed below, names are self-explanatory.
If your physical LAN uses 10.0.0.0/8, then you may want to change virtual network address
from 10.0.3.0/24 to some unused address range, e.g. to 192.168.20.0/24.
USE_LXC_BRIDGE="false"
LXC_BRIDGE="lxcbr0"
LXC_BRIDGE_MAC="00:16:3e:00:00:00"
LXC_ADDR="10.0.3.1"
LXC_NETMASK="255.255.255.0"
LXC_NETWORK="10.0.3.0/24"
LXC_DHCP_RANGE="10.0.3.2,10.0.3.254"
LXC_DHCP_MAX="253"
LXC_DHCP_CONFILE=""
LXC_DHCP_PING="true"
LXC_DOMAIN=""
Now restart the lxc-net service with systemctl restart lxc-net or reboot the workstation.
When lxc-net service is started, it will observe that USE_LXC_BRIDGE is true and
will setup virtual switch, connect host machine to this switch and start dnsmasq daemon,
that provides DHCP and DNS services to containers.
With virtual network present, you can instruct containers to connect to it.
To do this, add the following lines to /etc/lxc/default.conf and restart the containers.
This will enable networking in all containers.
Alternatively, you can edit configuration file of every container directly (/var/lib/lxc/<name>/config)
if you want to enable networking selectively.
Watch carefully option names, e.g. "net" vs "network".
Option names are different in LXC 2 and LXC 3.
Below settings are valid for LXC 3, which is shipped with Debian "buster".
lxc.net.0.type = veth
lxc.net.0.link = lxcbr0
lxc.net.0.flags = up
Now inside every container that has networking enabled you will see good old eth0 interface
up and running:
root@ff:/# /sbin/ifconfig -a
eth0: flags=4163<UP,BROADCAST,RUNNING,MULTICAST>  mtu 1500
        inet 10.0.3.243  netmask 255.255.255.0  broadcast 10.0.3.255

root@ff:/# apt-get install iputils-ping
Get:1 http://deb.debian.org/debian buster/main amd64 iputils-ping amd64 3:20180629-2 [43.0 kB]
Setting up iputils-ping (3:20180629-2) ...

root@ff:/# ping 10.0.3.1
PING 10.0.3.1 (10.0.3.1) 56(84) bytes of data.
64 bytes from 10.0.3.1: icmp_seq=1 ttl=64 time=0.110 ms

root@ff:/# ping 1.1.1.1
PING 1.1.1.1 (1.1.1.1) 56(84) bytes of data.
64 bytes from 1.1.1.1: icmp_seq=1 ttl=248 time=4.63 ms
With this setup there is full connectivity Container ↔ Host, Container ↔ Container2 and Container → Internet. Note that host and all containers are considered remote relative to each other, like if they were connected through physical LAN. If you wish to connect to a service running on one of them, then the service must listen on 0.0.0.0 or at least on 10.0.3.x, and also firewall rules must not prohibit packet flow in both directions. Listening only on 127.0.0.1 won’t work.
Network: better DNS
Containers are able to address each other by names (ping ff) immediately after basic network is set up.
No additional configuration is required.
When dhclient inside a container requests IP address, it also includes its hostname
as part of the request.
dnsmasq, acting as DHCP and DNS server simultaneously, assigns some IP address to the container
and also adds an entry to its DNS table.
Hence every container is able to resolve IP address of every other container transparently through DNS.
Host, on the other hand, is not able to resolve IP addresses of containers by default.
To fix this, we need to use local dnsmasq daemon as primary DNS server on the host.
Add following option to host’s /etc/dhcp/dhclient.conf:
prepend domain-name-servers 10.0.3.1;After reconfiguring networking you should see that local dnsmasq daemon is
always the primary DNS server.
This modification is robust to advertising of DNS servers by upstream routers,
e.g. when you move your laptop from one wireless network to another one.
10.0.3.1 will always remain the first entry.
gudok@gudok6:~$ sudo systemctl restart networking
gudok@gudok6:~$ cat /etc/resolv.conf
nameserver 10.0.3.1
nameserver 192.168.88.1
nameserver 1.1.1.1
nameserver 1.0.0.1
Now when some application on the host calls gethostbyname(),
DNS request is sent first to local dnsmasq daemon.
If request is the name of one of the containers, then dnsmasq will respond with its IP address by itself
by using its local DNS table.
For all other hostnames it acts as DNS proxy and sends requests to upstream DNS server
specified in /etc/resolv.conf.
Don’t worry: it is clever enough not to send requests recursively to itself.
If you want to address containers by their IP addresses and not by hostnames,
then it is desirable to assign static IP addresses to containers.
The clever way to do this is through dhclient configuration when container is created.
Choose unused IP address from 10.0.3.0/24 range and add the following option into container’s
/etc/dhcp/dhclient.conf:
send dhcp-requested-address 10.0.3.55;Now when container asks DHCP server for IP address, it will ask for this particular address 10.0.3.55.
If there are no collisions, then DHCP server will assign exactly this address.
This approach is better than static network configuration because container still sends DHCP request with its hostname,
allowing dnsmasq to add DNS entry {container name} → {desired IP}.
Network: protecting LAN from containers
Best practice of container isolation is to allow only those features that are truly required. Everything is prohibited unless explicitly allowed by configuration. And by enabling networking inside containers we already allowed too much. We allowed applications inside containers to connect to services running in the host environment and on all devices connected to physical LAN: smartphones, routers, and a variety of IoT devices which you might have in your LAN. Such setup has identically poor network security as running application directly on the host itself. If you have any services not protected by passwords, for example, HTTP server with listing of your home directory enabled or a home security camera, then your private data may be leaking to the outside via malicious software. And if you think that malicious software is the only troublemaker, then you are wrong. It is common for websites to build fingerprints of their users. Such fingerprints often include list of open services on localhost and on LAN devices. While you are browsing such web site, JavaScript code in the background tries to connect to well-known ports on your devices, e.g. 127.0.0.1:80, 192.168.0.1:22 and so on. The list of open services is sent to remote database to be included as part of your fingerprint.
Surely such behaviour must be prohibited. And containers are good in this regard because we can do this globally for all applications with iptables, rather than installing browser plugins or configuring AppArmor for every untrusted application. What we are going to do is to configure iptables to prohibit containers from establishing connections to LAN IP addresses.
Unfortunately lxc-net service already installs some rules, and it is impossible to override them cleanly
by using /etc/iptables/rules.v*.
We will have to patch directly /usr/lib/x86_64-linux-gnu/lxc/lxc-net.
There are two places in this file related to iptables setup: when lxc-net is started and when it is shut down.
Locate the first group and replace it with the rules below.
Also replace the rules for shutdown with the rules below, but now use -D option instead of -I.
If done right, then after starting and stopping lxc-net with systemctl stop lxc-net
iptables ruleset will be clean of lxcbr0 interface rules.
You can check this with sudo iptables --list -vn.
iptables $use_iptables_lock -I INPUT -i ${LXC_BRIDGE} -j DROP
iptables $use_iptables_lock -I INPUT -i ${LXC_BRIDGE} -m state --state RELATED,ESTABLISHED -j ACCEPT
iptables $use_iptables_lock -I INPUT -i ${LXC_BRIDGE} -p icmp -j ACCEPT
iptables $use_iptables_lock -I INPUT -i ${LXC_BRIDGE} -p udp -m udp --dport 67 -j ACCEPT
iptables $use_iptables_lock -I INPUT -i ${LXC_BRIDGE} -p tcp -m tcp --dport 67 -j ACCEPT
iptables $use_iptables_lock -I INPUT -i ${LXC_BRIDGE} -p udp -m udp --dport 53 -j ACCEPT
iptables $use_iptables_lock -I INPUT -i ${LXC_BRIDGE} -p tcp -m tcp --dport 53 -j ACCEPT
iptables $use_iptables_lock -I OUTPUT -o ${LXC_BRIDGE} -j ACCEPT
iptables $use_iptables_lock -I FORWARD -o ${LXC_BRIDGE} -j DROP
iptables $use_iptables_lock -I FORWARD -o ${LXC_BRIDGE} -m state --state RELATED,ESTABLISHED -j ACCEPT
iptables $use_iptables_lock -I FORWARD -i ${LXC_BRIDGE} -j ACCEPT
iptables $use_iptables_lock -I FORWARD -i ${LXC_BRIDGE} -d 10.0.0.0/8 -j DROP
iptables $use_iptables_lock -I FORWARD -i ${LXC_BRIDGE} -d 172.16.0.0/12 -j DROP
iptables $use_iptables_lock -I FORWARD -i ${LXC_BRIDGE} -d 192.168.0.0/16 -j DROP
iptables $use_iptables_lock -I FORWARD -i ${LXC_BRIDGE} -m state --state RELATED,ESTABLISHED -j ACCEPT
iptables $use_iptables_lock -I FORWARD -i ${LXC_BRIDGE} -p icmp -j ACCEPT
iptables $use_iptables_lock -t nat -I POSTROUTING -s ${LXC_NETWORK} ! -d ${LXC_NETWORK} -j MASQUERADE
iptables $use_iptables_lock -t mangle -I POSTROUTING -o ${LXC_BRIDGE} -p udp -m udp --dport 68 -j CHECKSUM --checksum-fill
The central idea of these rules is that we prohibit containers from initiating connections to LAN addresses. This means that container will be able to establish connection neither to the host processes, nor to any LAN device. The exceptions are made for DHCP and DNS services and also for ICMP packets. On the other hand, host and LAN devices are able to connect to services exposed by containers.
Similar ruleset is required for IPv6.
But because IPv6 turned out to be a stillborn technology, I prefer to disable it
permanently on host machine in /etc/sysctl.conf rather than waste my time on it.
Readers who disagree with me are free to write IPv6 ruleset on their own as an exercise.
net.ipv6.conf.all.disable_ipv6 = 1Rules above still allow communication between containers. I didn’t find elegant way of blocking it. If you really need to prohibit intercontainer communication, consider investigating one of the following options:
-
configure iptables inside containers (not robust)
-
setup single virtual switch per every container (a lot of coding)
-
setup VLANs on a single virtual switch (again a lot of coding)
X11 applications via SSH
The standard way of working with X11 applications on remote host is by using ssh -X/ssh -Y.
Containers are no different in this regard.
It should be noted in advance that X11 applications work slowly through SSH even
when application and X server are located on the same physical box.
Slowness is the result of data being encrypted, passed through network stack, and decrypted.
This significantly increases transmission latency.
The next section will explain how to work with X11 applications directly without any intermediaries,
but currently let’s focus on doing this with SSH, which is much simpler.
First let’s perform standard SSH setup on the container.
Generate new key (SSH will create $HOME/.ssh directory layout with correct permissions),
and also add your host’s public key into the list of authorized keys in the container.
Now we can connect from host to the container without entering password.
gudok@gudok6:~$ sudo lxc-attach -n ff -- ssh-keygen -t rsa
Generating public/private rsa key pair.
Created directory '/root/.ssh'.
Your public key has been saved in /root/.ssh/id_rsa.pub.
The key fingerprint is:
SHA256:L42mhV/WvyYorFW9d4jKSf1ox08OXDcJcmzf3MsBLU4 root@ff

gudok@gudok6:~$ cat ~/.ssh/id_rsa.pub | sudo lxc-attach -n ff -- tee -a /root/.ssh/authorized_keys
ssh-rsa AAAAB3NzaC1yc2EAAAADAQABAAABAQC/ES4Ep//7qM23EBGPME9tb1pup+7wz0/GbFiDXYqhVNRqys6xKdDB/tuns3iFsBEH93ppN9/vkFKWrUShXlDF/1pUP6pzqet3U8caBdTEHzNbDijGqxzGWUEOeJ/4o7AN14EWC1QYlR12cjGKZt1B+uYYy4s8F2HEgAOjskL7Pr7TIpp9OTKX7AVihvcQKtNtHGPLWGvqMkfKEdioBF3OUeH8aVAIjJHVtF+M+Ywahf7fAPOdk40CBDtwVROds4HcGgdlxuDnRDpm5JjheSsK9YT4drhsK+/uuciT+2wIeZsqswU4zTWjOBAx91iRtccptz7LLvs6jM+EJ98ue9U3 gudok@gudok6

gudok@gudok6:~$ ssh root@$(sudo lxc-info -Hin ff)
Linux ff 4.19.0-5-amd64 #1 SMP Debian 4.19.37-5 (2019-06-19) x86_64
Last login: Thu Aug 22 13:59:40 2019 from 10.0.3.1

root@ff:~#
Next step is to fix SSH behaviour.
There are two standard connection modes in X11: trusted and untrusted.
In trusted mode application has full control over the display.
It may, among other things, take screenshots and subscribe to all key events like a keylogger.
Untrusted mode prohibits all potentially malicious actions.
Historically there was only trusted mode, it could be enabled with ssh -X.
Later, when security implications of trusted mode became apparent, an untrusted mode was added.
SSH introduced ssh -Y option meant to be used when you really want to establish trusted connection,
while ssh -X was downgraded to mean untrusted connection.
But not in Debian.
To avoid compatibility issues, both ssh -X and ssh -Y refer to trusted mode in Debian by default.
Let’s fix this.
Add the below options into /etc/ssh/ssh_config.
They revert behaviour of SSH to that of SSH upstream configuration and other Linux distributions.
ssh -X and ssh -Y will now establish untrusted and trusted connections respectively.
Host *
ForwardX11Trusted no
The final step is to install a couple of packages in a container: xauth and x11-apps.
The first one is mandatory because it is used by SSH to store authorization information.
ssh -X/-Y won’t work without it.
Second package contains a bunch of small applications handy for testing X11, including xlogo, xeyes and xwd.
root@ff:/# apt-get install --no-install-recommends xauth x11-apps
Reading package lists... Done
Setting up x11-apps (7.7+7) ...
Setting up xauth (1:1.0.10-1) ...
Processing triggers for man-db (2.8.5-2) ...
If everything was done right, now you will be able to connect from host to a container with SSH
and launch X11 applications successfully.
If this doesn’t work, rerun ssh with -v option and read the error log.
gudok@gudok6:~$ ssh -X root@$(sudo lxc-info -Hin ff) xeyes
Untrusted mode (ssh -X) is enough for majority of applications.
Trusted mode (ssh -Y) may be required if application requires deep integration with graphical subsystem,
such as graphical acceleration.
To check the differences between trusted and untrusted modes, you can try to take a screenshot.
First command works fine, but second one fails with fatal error.
gudok@gudok6:~$ ssh -Y root@$(sudo lxc-info -Hin ff) 'xwd -root -screen -silent -display $DISPLAY > /tmp/screenshot.xwd'

gudok@gudok6:~$ ssh -X root@$(sudo lxc-info -Hin ff) 'xwd -root -screen -silent -display $DISPLAY > /tmp/screenshot.xwd'
bash: line 1:  1207 Segmentation fault      xwd -root -screen -silent -display $DISPLAY > /tmp/screenshot.xwd
X11 applications via unix socket
X forwarding with SSH is slow. You can see it, for example, when scrolling a web page in a browser. We need another way. Actually, we can make in-container applications work as fast as on host system, since both container and X server are located on the same physical box. The fact that containers are confined to isolated environments is not an obstacle. But in order to make use of new approach, we need to understand the basics of X. We are interested in two topics: transport protocols and authorization.
Applications communicate with X server by means of some stream-oriented transport. X server supports the following transports: pathname unix sockets, abstract namespace unix sockets, TCP. What transports X server actually listens to depends on the options it was started with. And because starting X server is the responsibility of desktop manager, list of effective transports may vary depending on the used desktop manager. For example, SDDM by default starts X server with only abstract namespace unix socket enabled. Any local application can use it to connect to X server. But it won’t work for in-container applications because there is no way of sharing (at least in an easy way) abstract namespace unix sockets into containers.
What we are going to do is to enable pathname unix socket transport in X server
and then mount it into containers.
Pathname unix sockets can be mounted into containers like directories and regular files.
To enable this transport, we need to modify desktop manager settings.
The process depends on desktop manager.
In SDDM it is done by creating /etc/sddm.conf file with the following contents:
[X11]
ServerArguments=-listen unix -listen local -nolisten tcp
This set of arguments instructs X server to create and listen on pathname unix socket
(/tmp/.X11-unix/X0) and abstract name space unix socket (@/tmp/.X11-unix/X0), but not to listen on TCP.
After restarting X server we can check that X is really started with these options
and that it really listens on both types of unix sockets.
Abstract namespace unix socket is denoted in netstat output with @ in the beginning of its "path".
Actually, it is not a path, but just a unique socket name.
It is not present in filesystem in contrast to another, pathname unix socket.
gudok@gudok6:~$ sudo systemctl status sddm
● sddm.service - Simple Desktop Display Manager
   Active: active (running) since Wed 2019-08-21 17:48:42 MSK; 1 day 1h ago
   CGroup: /system.slice/sddm.service
           ├─ 927 /usr/bin/sddm
           └─6213 /usr/lib/xorg/Xorg -listen unix -listen local -nolisten tcp -auth /var/run/sddm/{3390f040-4b79-471c-8d44-1ad0871bf16a

gudok@gudok6:~$ netstat -l | grep X11-unix
unix  2      [ ACC ]     STREAM     LISTENING     147529   /tmp/.X11-unix/X0
unix  2      [ ACC ]     STREAM     LISTENING     147528   @/tmp/.X11-unix/X0
Now let’s mount /tmp/.X11-unix/X0 into the container and set other important options in advance.
Add the following options into /etc/lxc/default.conf or into per-container configuration file
and restart affected containers.
After attaching to container you should see the file /tmp/.X11-unix/X0 present with the identical
attributes as on the host.
X11 applications will be able to use it to connect to X server.
In addition to mounting, we also set custom path for .Xauthority file that will be used
to store authorization cookies, and DISPLAY variable.
The latter instructs applications which transport to use.
Values :0 through :9 correspond to unix sockets.
If, for example, DISPLAY=:5, then application will try to connect to
/tmp/.X11-unix/X5 and @/tmp/.X11-unix/X5, and fail if neither of them works.
Values :10 through :19 correspond to TCP ports 6010 through 6019.
lxc.mount.entry = /tmp/.X11-unix tmp/.X11-unix none ro,bind,create=dir 0 0
lxc.environment = DISPLAY=:0
lxc.environment = XAUTHORITY=/root/.Xauthority
Second challenge is authorization.
Host applications use so called "server interpreted" authorization.
It allows all applications on the host running with UID of your user to connect to X server in trusted mode.
We instead will use more restrictive cookie based authorization inside our containers.
It works in the following way: we use xauth generate <options> utility on host system.
It connects to X server and asks it to generate new authorization cookie with given options.
Server generates new cookie, stores it internally until restart, and returns it also to xauth client,
which stores it in .Xauthority file.
Next we use again xauth program, now inside a container, to store newly generated cookie in container’s .Xauthority.
gudok@gudok6:~$ xauth -f /tmp/ff.xauth generate :0 . untrusted timeout 2147483
xauth:  file /tmp/ff.xauth does not exist

gudok@gudok6:~$ xauth -f /tmp/ff.xauth list
gudok6/unix:0  MIT-MAGIC-COOKIE-1  8897d56747607202463ef46e20d7f389

gudok@gudok6:~$ sudo lxc-attach -n ff

root@ff:/# xauth add $DISPLAY MIT-MAGIC-COOKIE-1 8897d56747607202463ef46e20d7f389

root@ff:/# xauth list
ff/unix:0  MIT-MAGIC-COOKIE-1  8897d56747607202463ef46e20d7f389

root@ff:/# xeyes
Important points are that we use untrusted mode, that we specify large timeout and
that we use custom .Xauthority file on the host.
Timeout sets when cookie is expired in X server.
After expiration, X server will remove it from the list of allowed cookies and
applications won’t be able to connect anymore with this cookie.
Default timeout is only a couple of seconds, which is not enough even to start single application manually.
We set it instead to the highest possible value.
At the moment of writing values larger than 2147483 cause X server to crash due to a bug.
Custom .Xauthority file is important because otherwise xauth will rewrite respective cookies in the default one.
We don’t want this because settings for already exiting cookies and newly generated ones are different.
The above sequence of actions must be performed after every X server restart. To avoid the hassle, create a script to connect to a container. You can use the below basic script to start with.
#!/usr/bin/env bash
set -e
set -o pipefail
set -u

readonly container='ff'
if [ $(sudo lxc-info -sH -n ${container}) != 'RUNNING' ]; then
  sudo lxc-start -n ${container}

  path=$(mktemp /tmp/xauth.XXXXXXXXXX)
  xauth -f ${path} generate ${DISPLAY} . untrusted timeout 2147483
  cookie=$(xauth -f ${path} list | grep ${DISPLAY} | awk '{print $3}')
  rm -f ${path}
  sudo lxc-attach -n ${container} --clear-env xauth add ':0' . ${cookie}
fi
exec sudo lxc-attach -n ${container} --clear-env -- $@
To complete the picture, here is the explanation why this setup works and how SSH setup differs from it.
When some X11 application is started inside a container, it notices that DISPLAY variable is set to :0.
This instructs it to use /tmp/.X11-unix/X0 and @/tmp/.X11-unix/X0 unix sockets as transport to X server.
It tries them both and detects that the first one is working.
Next the application reads XAUTHORITY variable that gives the location of the file with cookies as /root/.Xauthority.
It searches it for the cookie corresponding to display :0 and uses this cookie to authorize itself within X server.
X server grants permission because it previously issued this cookie and it has not expired yet.
SSH forwarding has the same authorization process, but it uses TCP as the transport.
When connection with ssh -X/-Y is established, SSH opens TCP socket 6010 inside the container,
pretending to be X server itself, and also setups DISPLAY and XAUTHORITY variables.
Applications see that DISPLAY is :10.
This instructs them to use TCP localhost:6010 as transport.
SSH forwards all data on :6010 to the client SSH process on the host machine,
which in turn forwards it to host’s /tmp/.X11-unix/X0 or @/tmp/.X11-unix/X0.

PulseAudio
PulseAudio works similar to X server, except that it doesn’t use authorization by default.
It works through unix socket, which we can mount inside containers.
Applications which use PulseAudio are aware of PULSE_SERVER environment variable.
It consists of protocol name (unix:) followed by path to unix socket
to be used to communicate with the server.
Adding the below options to container configuration file is all that is needed for PulseAudio to work.
Obviously, 1000 must be replaced with the UID of your user.
You can retrieve UID of your user with id command.
lxc.mount.entry = /run/user/1000/pulse/native tmp/pulse/native none rw,bind,create=file 0 0
lxc.environment = PULSE_SERVER=unix:/tmp/pulse/native
After that restart containers, install pulse utilities and test audio. Don’t forget to enable microphone if it is disabled:
root@ff:/# apt-get install --no-install-recommends pulseaudio-utils
Setting up pulseaudio-utils (12.2-4) ...

root@ff:/tmp# parecord > voice.wav
^C
root@ff:/tmp# paplay < voice.wav
If you don’t want to share PulseAudio socket of your user, you can create additional socket specifically to be used inside containers. On host system execute the following command and then adjust the configuration of containers accordingly:
gudok@gudok6:~$ pactl load-module module-native-protocol-unix socket=/tmp/pulse.socketWebcam
Video cameras have standard "video4linux" interface in Linux and are available as /dev/video* devices.
Thus, they can be mounted into containers.
In addition to mounting we also need to set permissions
to allow in-container processes to access file devices.
To do so, we need to find out device ID.
gudok@gudok6:~$ ls -l /dev/video*
crw-rw----+ 1 root video 81, 0 Aug 21 17:48 /dev/video0
crw-rw----+ 1 root video 81, 1 Aug 21 17:48 /dev/video1
Here I have two video cameras. They are character devices ("c") with major device number 81 and minor device numbers 0 and 1 respectively. Major device ID corresponds to some class of the device. These numbers are fixed, with character device 81 being reserved for video4linux device type. Device number association can also be retrieved from documentation. Now let’s mount the device and allow containers to read/write all character devices with major device number 81:
lxc.cgroup.devices.allow = c 81:* rw
lxc.mount.entry = /dev/video0 dev/video0 none bind,optional,create=file
To check whether webcam works, you can use VLC or any other media player with video capture capability.
Or if you don’t want to install heavy packages, then there is simple fswebcam utility.
It captures single frame from the camera and writes it as still image.
root@ff:/# apt-get install --no-install-recommends fswebcam
Setting up fswebcam (20140113-2) ...

root@ff:/# fswebcam -S 5 /tmp/test.png
/dev/video0 opened.
Skipping 5 frames...
Capturing 1 frames...
Writing JPEG image to '/tmp/test.png'.
Described method is applicable not only for webcams.
Any device that is communicated with by means of some /dev/* file can be allowed access from containers by mounting it.
Find out the device file, call ls -l on it to display its major/minor device numbers and type (block or character),
and add the appropriate options to container configuration file.
Application troubleshooting
Some applications may work differently or refuse to function altogether if run under root. For instance, this is the case with VLC. It refuses to work under root user referring to security concerns. However, there is not much sense in adding new user from security point of view when we are inside a container. Instead VLC may be patched with the following common hack:
root@ff:/# sed -i 's/geteuid/getppid/' /usr/bin/vlcDefault container images are minimalistic.
Third-party applications may require manual installation of additional packages.
For example, Skype installs but fails to start without printing any diagnostic information to console.
However, reading its log file reveals that libgconf-2-4 must be installed.
In general case if third-part application doesn’t work and doesn’t produce meaningful error messages,
the first step to debug it is to use strace.
Some applications may depend on environment variables.
For example, applications based on ncurses library, such as top, require TERM to be correctly set.
Firefox communicates with other running instances by means of X Window tree.
If you try to launch it from inside a container, it will create new window of already running Firefox in the host (spooky!).
You can disable this remote communication feature by starting it as firefox -no-remote.
Firefox is also prone to hanging during startup if environment variables are not cleared.
Caching packages
Typically the same set of basic packages is installed in every container.
If you do not have APT repository in your LAN, then this may be time-consuming.
To solve this problem, you can setup apt-cacher-ng that acts as a caching proxy
to Debian/Ubuntu repositories and then instruct containers to use it instead of connecting
to APT repository directly.
Create additional container that will be used exclusively as a cache, I call it acng below.
Install apt-cacher-ng inside it.
As soon as you install it, it starts listening on standard proxy port 3142.
root@acng:/# apt-get install apt-cacher-ng
Setting up libwrap0:amd64 (7.6.q-28) ...
Setting up apt-cacher-ng (3.2-2) ...
Now let’s instruct containers to use this proxy when accessing APT repositories.
First, we must be sure that all repository URLs use raw http scheme and not https.
It doesn’t matter what particular mirrors are used, only the scheme.
Default sources.list configuration is fine.
If you added other repository URLs manually, then check that they use HTTP scheme.
Next, add proxy file that instructs APT to access repository via proxy.
These steps can be performed on all containers, including proxy container itself and even host machine.
root@ff:/# cat /etc/apt/sources.list
deb http://deb.debian.org/debian buster main
deb http://security.debian.org/debian-security buster/updates main

root@ff:/# cat /etc/apt/apt.conf.d/proxy
Acquire::http { Proxy "http://acng:3142"; }
Now when installing new packages, apt-get will send requests via proxy.
Proxy will detect that requested URL belongs to one of Debian repositories
and return cached package if found.
If package is not yet cached, it will download package.
It will always use the same deb.debian.org no matter what mirror is specified in the URL.
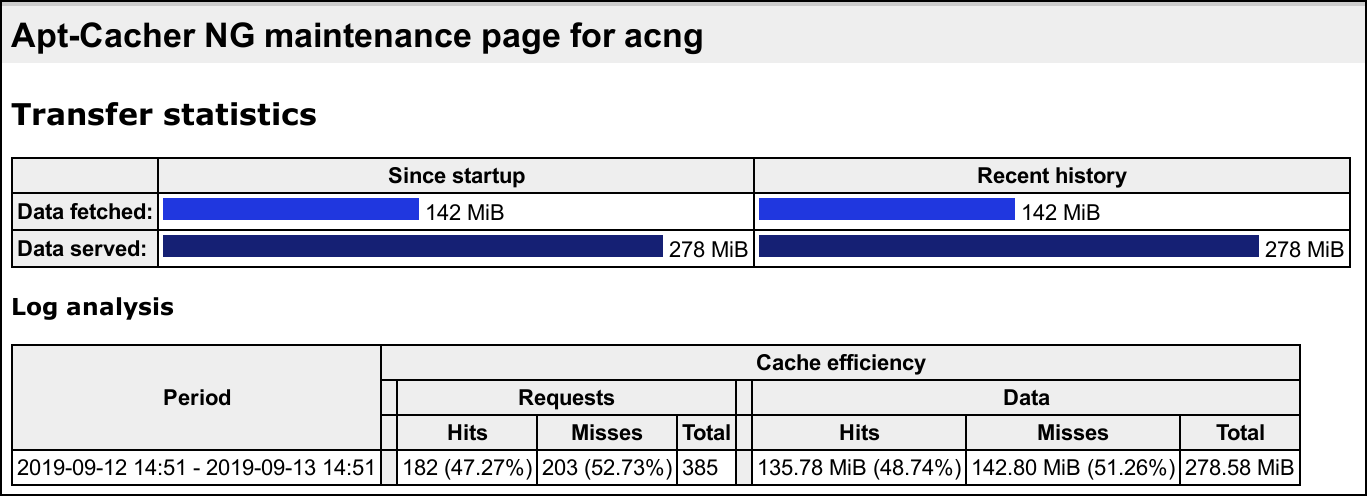
In addition, apt-cacher-ng instance exposures report on cache efficiency.
Provided you configured DNS as was described in the corresponding section, you can access
it directly from the host at http://acng:3142/acng-report.html.
Unprivileged containers
Described above recipes are applicable for so-called privileged containers. Privileged containers are started under root user, which is able to configure all confinement features. In contrast, unprivileged containers allow to create and run containers under ordinary users. Unfortunately, setup becomes more complicated, and there are also additional restrictions imposed on unprivileged containers. And because security of unprivileged containers is not significantly better than that of privileged ones, I do not recommend to get involved with them. However, if you really want to, then first test setup with privileged containers before repeating it with unprivileged ones. Unprivileged containers are much harder to debug. Errors may vary from flapping error messages to segmentation faults.
All commands now must be executed with ordinary user. Other differences:
| priveleged | unpriveleged | |
|---|---|---|
User |
root |
Any ordinary user |
Default configuration file |
|
|
Container location |
|
|
Container template |
|
|
Below is the list of what needs to be done to make unprivileged containers work:
1. Set option kernel.unprivileged_userns_clone = 1 in /etc/sysctl.conf
2. Install following packages: uidmap, libpam-cgfs
3. Ensure that /etc/subuid and /etc/subgid have your user included.
Both files should contain entry similar to this one: gudok:689824:65536.
I suggest to change values to gudok:0:2147483647, so that your user will be entitled to use full range of UID/GIDs,
and thus allowed to make one-to-one mapping between host’s UID/GIDs and container’s UID/GIDs.
If entries for your user are missing, add them either with
usermod --add-subuids/--add-subgids or manually.
4. Copy /etc/lxc/default.conf to $HOME/.config/lxc/default.conf.
This will be default configuration file for user’s LXC containers.
Create directory hierarchy if it doesn’t exist.
5. Add UID and GID mappings to the default configuration file. Unlike privileged containers, mapping entries are mandatory. If your prefer to create custom user inside container, just add one-to-one UID/GID mappings and next create user inside container identical to that one used in the host. Like this:
lxc.idmap = u 0 0 65536
lxc.idmap = g 0 0 65536
Otherwise, if you prefer to work as root, then create mapping that will map container’s UID/GID=0 to your host’s user UID/GID (usually 1000).
How to do this was described in the section "Accessing host data".
Note that you can add multiple mapping entries, but be sure that 1) they do not intersect; 2) that you are allowed
to access all UID/GIDs according to /etc/sub{u,g}id; 3) at least UID/GIDs in range [0..0+65536) must be mapped to somewhere
because some default system users are created with high UID/GID values.
In the example below, container’s UID/GID range [0..0+65536) is mapped to host’s [100000, 100000+65536)
with the exception of UID/GID=1000, which is mapped to the identical values in the host.
lxc.idmap = u 0 100000 1000
lxc.idmap = g 0 100000 1000
lxc.idmap = u 1000 1000 1
lxc.idmap = g 1000 1000 1
lxc.idmap = u 1001 101001 64535
lxc.idmap = g 1001 101001 64535
6. In the default configuration file, change lxc.apparmor.profile = generated
to lxc.apparmor.profile = unconfined.
7. Create /etc/lxc/lxc-usernet and add entry for your user: gudok veth lxcbr0 100.
This will allow you to have up to 100 containers connected to virtual switch.
8. Reboot the workstation (you may get cryptic segmentation faults if don’t do that)
9. Run lxc-checkconfig and check that everything is enabled and there are no error and warning messages.
Now it is possible to create unprivileged containers.
The procedure is exactly the same as with privileged containers, just run all the commands with ordinary user, not root.
Remember that lxc-debian template won’t work, only lxc-download.
If something goes wrong, try to execute lxc-* command with --logfile /tmp/lxc.log --logpriority DEBUG options.
Log file contains much more verbose messages than those ones printed to stdout.
All other features described in the article work fine with unprivileged containers except accessing device files.
Unprivileged containers do not support lxc.cgroup.devices.allow option.
Remove it from (default) configuration file, or containers will fail to start.
Device files can still be mounted, but you have to manually set permissions on them.
The easiest way is to allow everybody to read/write the device file:
gudok@gudok6:~$ sudo chown a+rw /dev/video0There is also another, cleaner way.
Create one more device file with mknod with the same attributes (device type, major id, minor id)
as the original device file.
Hence both files will refer to the same actual device object inside Linux.
Now set the owner of the new file to be the UID:GID of the root user of the container.
The latter numbers are not the same as your user ID.
Instead they are the first values from UID/GID mappings.
First user created inside a container is root, hence the very first numbers from UID/GID mappings
are used to map it outside the container.
Alternatively, check the ownership of the root filesystem of the container.
gudok@gudok6:~$ ls -l /dev/video0*
crw-rw-rw-+ 1 root video 81, 0 Aug 27 09:34 /dev/video0

gudok@gudok6:~$ sudo mknod /dev/video0.gudok c 81 0

gudok@gudok6:~$ ls -ld $HOME/.local/share/lxc/ff/rootfs
drwxr-xr-x 21 689824 689824 4096 Aug 26 08:26 /home/gudok/.local/share/lxc/ff/rootfs

gudok@gudok6:~$ sudo chown 689824:689824 /dev/video0.gudok

gudok@gudok6:~$ ls -l /dev/video0*
crw-rw-rw-+ 1 root   video  81, 0 Aug 27 09:34 /dev/video0
crw-r--r--  1 689824 689824 81, 0 Aug 27 11:30 /dev/video0.gudok
Now we have additional device file which refers to our camera and is owned by the container’s root user. We can mount it. Processes in containers running under container’s root now should be able to access the device file.
lxc.mount.entry = /dev/video0.gudok dev/video0 none bind,optional,create=file