When you scale images, you have to choose interpolation algorithm. There are two most common interpolation algorithms: bilinear and bicubic. The problem is that both algorithms use fixed number of pixels of the original image to produce single pixel of the thumbnail. Bilinear interpolation computes single thumbnail pixel by taking 2x2 pixels of the original image, while bicubic interpolation takes 4x4 pixels. This is fine provided that scaling coefficient is less or equal to 2 (bilinear) or to 4 (bicubic). However, when scaling coefficient is bigger than 2(4), some pixels of the original image do not contribute to thumbnail at all.
For example, bilinear interpolation could be implemented in the following ways:

Note that "white" pixels of the original image are not used at all. Thumbnails produced by such implementations have noticeable artifacts, the most common of which is aliasing, when oblique line is transformed into steps-like polyline. The bigger scaling coefficient is, the worser the artifacts are.
There is misunderstanding caused by differences between end-user software (Photoshop, GIMP) and image processing libraries (e.g. OpenCV). When you select "bicubic interpolation" in end-user software, then actually more complex multistage algorithm is used under the hood, with selected interpolation method being only the basic step of this complex algorithm. This is done to ensure that all input pixels have even contribution to final thumbnail. In contrast to that, image processing libraries provide access to raw, by-the-book interpolation algorithms. If you want to create high-quality thumbnails, you will have to manually implement multistage algorithm.
Practical approach that produces thumbnails of good quality and also that is fast enough is the multistage algorithm that downscales image in a number of steps. At every step except the final one image is downscaled by a factor of 2. It’s better to use linear interpolation in these steps for better performance. At the final step, intermediate image is downscaled to target dimensions by using desired interpolation algorithm, typically bicubic. Such approach produces high-quality thumbnails because all input pixels are taken into account. For example, 2048x2048 image can be downscaled to 200x200 with the following series of steps:
-
bilinear(2048x2048) → 1024x1024
-
bilinear(1024x1024) → 512x512
-
bicubic(512x512) → 200x200
1
2
3
4
5
6
7
8
9
10
11
12
13
14
15
16
17 cv::Mat downscale(cv::Mat img, double ratio) {
assert(ratio <= 1.0);
while (ratio < 0.5) {
img = cv::Mat(img, cv::Rect(0, 0, img.cols/2*2, img.rows/2*2));
cv::Mat tmp;
cv::resize(img, tmp, cv::Size(img.cols/2, img.rows/2), 0, 0, cv::INTER_LINEAR);
img = tmp;
ratio = ratio * 2.0;
}
if (img.cols * ratio != img.cols) {
img = cv::Mat(img, cv::Rect(0, 0, img.cols/2*2, img.rows/2*2));
cv::Mat tmp;
cv::resize(img, tmp, cv::Size(img.cols*ratio, img.rows*ratio), 0, 0, cv::INTER_CUBIC);
img = tmp;
}
return img;
}
Compare the results below. First image was created by using single pass of bicubic interpolation that scaled down original image by 1/8. Second image was created by using multistage algorithm as described above: 1/2 bilinear, 1/2 bilinear, 1/2 bicubic.

You can notice large number of artifacts in the first version: buildings outlines are aliased, the sky is noisy, and the pebbles on the beach are oversharpenned. Multistage version is almost devoid of these artificats.
Classical interpolation algorithms are meant to be applied to images where pixel-to-pixel transitions are smooth, such as in photographs. Interpolation preserves this smoothness. Bicubic interpolation does this more aggressively compared to bilinear interpolation because it uses weighted function atop of 4x4 (rather than 2x2) original pixels to compute single pixel of downscaled image. However, not all images are photographs. There are a lot of other image types which have sharp pixel-to-pixel transitions. For example, this is the case with scanned text, GUI screenshots, pencil drawings and map tiles. Typically, such images are created artificially and incorporate large number of fine-grained sharp details. Naive downscaling by using bilinear or bicubic interpolation smooths sharp transitions, making output thumbnails blurry and image details indistinguishable.
The easiest way to fix this is to apply unsharp masking after downscaling. First, we perform multistage downscaling as described above and after that we apply unsharp masking. This allows us to simultaneously achieve the quality of multistage downscaling and also to retain sharpness of the original image.
1
2
3
4
5
6 cv::Mat unsharp_masking(cv::Mat img) {
cv::Mat res;
cv::GaussianBlur(img, res, cv::Size(0, 0), 2.0, 0.0, cv::BORDER_DEFAULT);
cv::addWeighted(img, 1.5, res, -0.5, 0, res);
return res;
}
A piece of text was scanned at 600 dpi for demonstration. First example is the thumbnail produced by downscaling scanned image by 1/8 by using multistage algorithm. Second example is the very same thumbnail after applying unsharp masking to it.
JPEG compression can be described in layman’s terms as following: read input image and perform Fourier-like reversible transformation, which produces large matrix of coefficients. Coefficients located in top left corner are responsible for lowest frequencies, they carry significant amount of information and therefore are important for image reconstruction. Coefficient located in bottom right corner are responsible for highest frequencies, they make smaller contribution to information. The core idea of JPEG compression (and actually of all lossy multimedia compression algorithms) is to store only coefficients responsible for the lowest frequencies. Other coefficients are either entirely omitted or are quantized very roughly. JPEG quality setting (0..100) governs exactly the aggressiveness of this algorithm.
If JPEG quality is set to 100, then all coefficients are preserved. Hence the original image can be reconstructed nearly losslessly. If JPEG quality is set to low value, then a lot of high-frequency coefficients are coarsened. Decoded image still looks similar to the original one, but with some added noise. If we are to fix JPEG quality setting at some value, noise becomes more prominent with progressively smaller thumbnails of the same image. The reasons are the following:
-
Actually, JPEG codec performs encoding process not for the image as the whole, but for every block 8x8 pixels. The smaller the thumbnail is, the more information every 8x8 block carries. As such, coarsening coefficients to the same extent will lead to more significant quality drop in small thumbnail compared to larger one.
-
When thumbnail is small, it is entirely in the central field of view of the user. Image can be analyzed without eye movement. It becomes much easier to spot global noise patterns.
In the example below noise is barely noticeable in the large image, but is prominent in the small one. (CC BY-SA 4.0 licensed image is courtesy of wiki user Berry-Touraine2.)
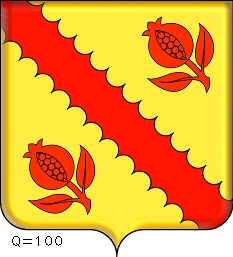
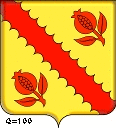
The conclusion is that JPEG quality must be chosen adaptively based on the size of the thumbnail. Image originals (thousands of pixels in each dimension) can be encoded with JPEG quality as low as 70. It makes output file very compact, and noise is still barely noticeable. 256x256 thumbnail of the same image should be encoded with higher JPEG quality, let’s say 85+. Icon-sized thumbnails look satisfactory only if encoded with JPEG quality of 95..100. Actually, JPEG is not the best choice for storing icon-size images. It would be better to use lossless PNG in this case. However, when the original image is already lossy JPEG, then it is just not reasonable to store thumbnail in a format different from JPEG.
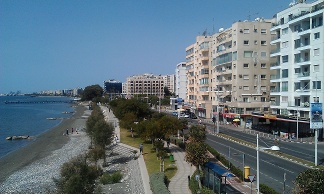
Often UI design requires to create thumbnails with fixed aspect ratio, most commonly of square shape. When aspect ratio of the original image is changed, some parts of the image are removed. Typically, cropping is done by evenly chopping off borders of the longer side of the image. This is done because of naive assumption that the most valuable information is located in the center of the image. Often this assumption is wrong. Objects of interest may be located near one of the edges, either by mistake or for aesthetical reasons. When naive center-oriented cropping technique is used, these important objects may be omitted or partially cut out, and the thumbnail stops to adequately represent the original image.

A wiser solution is to analyze image and to find regions of interest in it. Selection of optimal algorithm strongly depends on image dataset. It would be different for landscapes, portraits or showcase photos. Anyway, a number of simple generic algorithms may be used universally:
-
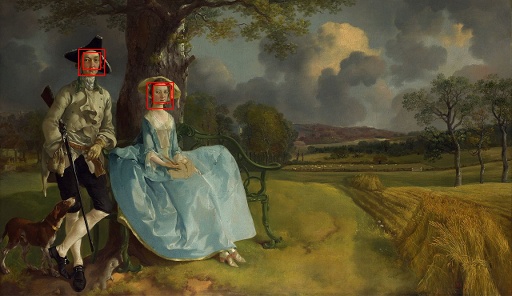
Face detection. If image contains faces, you definitely want to preserve them in thumbnail. In particular, in case of full body portrait, face detection is beneficial because it is the face that gets into thumbnail and not the belly.
-
Edge detection. Classical edge detection algorithms can help to detect contours of the objects over simple-tone background.
-
Weighting different parts of the image. Another technique is to split image into grid of small squares (e.g. 64x64) and to assign every region a weight based on some statistical metric (e.g. palette richness) or DCT (discrete cosine transform) variation. Regions with higher weight carry more information and therefore can be assumed more important than the others.
Now we can create optimal thumbnail by maximizing number of regions of interest and/or their weights.
Not necessarily thumbnail is cut out from the center anymore.
It may be shifted towards one of the edges.
In the example below, first thumbnail was extracted from the center of the original image,
while second thumbnail was created by locating faces and optimizing
 ,
i.e. ideal thumbnail is the one that contains all faces and also where face objects are as close
as possible to the center of the thumbnail.
,
i.e. ideal thumbnail is the one that contains all faces and also where face objects are as close
as possible to the center of the thumbnail.

Another approach is using Seam carving algorithm or its derivatives. Instead of cropping image by removing edges, it is able to remove separate rows and columns inside image. Thumbnail can be more representable of the original image, for example when objects of interest are located near edges, while center of the image is empty. However, the benefits of this algorithm are also its drawbacks, since it can distort image too much.
Don’t forget about HiDPI displays.
No matter how hard you try to enhance thumbnails, they will be rendered blurry on HiDPI displays
unless you take additional precautions.
The problem is that every single "CSS" pixel is actually
mapped to larger number of physical pixels in HiDPI displays.
For example, in a display with window.devicePixelRatio = 2 every 1px is actually
mapped into a region of 2x2 physical pixels.
Therefore raster images look blurry by default.
There is no such problem with text, vector images and window UI elements because
browser converts these items into raster images itself, and it does so while being HiDPI-aware.
However, browser can’t do anything smart with images which are already of raster type.
What this means is that in order to make thumbnails map natively to physical pixels,
they must be of different sizes for displays with different devicePixelRatio.
For example, if you created a region of 200x200 CSS pixels with <img style="width:200px; height:200px;">
then actual image size must be 200x200 for ordinary displays, 300x300 for displays
with devicePixelRatio=1.5 and 400x400 for displays with devicePixelRatio=2.
From backend point of view,
you can either pregenerate thumbnails of different sizes for well-known device pixel ratios,
or you can setup a server that will create thumbnails of required size on the fly
(/get_thumbnail?id=2e3a9a76d071&w=320&h=240).
Performance is typically not an issue in latter case.
Since modern JPEG libraries and image processing software are both SIMD-optimized,
generating thumbnails on the fly takes just couple of milliseconds even for thumbnails of medium size.
Below is the generic workflow that describes how to generate high-quality thumbnails.
Provided that image should be loaded into HTML element of size css_height x css_width,
do the following:
-
Load image and decode it into pixel matrix
-
If image has aspect ratio different from the desired one:
-
Create temporary small thumbnail using cheapest downscaling algorithm
-
Detect and weight important regions using temporary thumbnail
-
Find optimal location for cropping that would preserve important regions
-
Crop image to get desired aspect ratio
-
-
Based on browser’s
devicePixelRatio, compute thumbnail dimensions: (css_heightxdevicePixelRatio,css_widthxdevicePixelRatio) -
Downscale image:
-
While current image dimensions divided by thumbnail dimensions >= 2, repeat:
-
If current image has odd number of rows/columns, chop off one row/column
-
Downscale image by factor of two using bilinear interpolation
-
-
Perform final downscale step using bicubic interpolation
-
-
If image contains small details:
-
Apply unsharp masking
-
-
Encode image into JPEG
-
Select JPEG quality:
-
Use 95 for images with side <= 100 pixels
-
Use 85 for images with 100 < side <= 400 pixels
-
Use 75 for images with side > 400
-
-
Perform encoding
-
-
Put image URL under
<img>tag or similar. Set<img>height and width attributes explicitly tocss_widthandcss_heightrespectively.